Sunday 26 November 2017

Shipped eggs, candelling the slow movers day 10

At this point, we are actually on day 16... the rotohatch eggs are no longer being turned, as they were obviously the most damaged I wanted to give them a bit more time to get into hatching position.
Tomorrow evening all remaining eggs will be candled and (hopefully) all will go into lock down.
We are over 2/3rds of our way through incubation and the waiting doesn't get any easier!

Monday 20th was day 10, apparently it's okay to candle eggs you are unsure of from day 7
 
 
this would be eggs 2-6 in the Brinsea.

                                                  
Egg 3

Egg 5
 
All 5 looked empty, no veins, no visible embryo. Air cells were either difficult to spot or showed me I had missed that they were damaged.
But they didn't smell either, after some internal debate over whether we should leave them in and check again Friday, we took out egg 2. I candled again
and held it for a bit,
it was warm

but it looked clear.
 
 
I took it to the kitchen and placed it in a snaplock bag, I've never cracked an egg that's been kept so warm for so long and wasn't entirely sure what we'd find once the shell was open.
I took a butter knife and tapped around the fat end of the shell like it was a coconut.
 
 
Once carefully opened, it was obvious, the egg wasn't at all developing. Unfortunately the bag smooshed the yolk, I couldn't tell if the egg was even fertile.
 
 
Egg 3 was carefully opened into a plate since it seemed like the next 4 eggs wouldn't explode stinky rotten egg everywhere. Much easier to see! looks like this egg may have been fertile, the air cell has grown, but nothing else has.


Egg 4 looked the same, the little circle off to the side is a meat spot i think, just a normal possible tiny piece of something from the hen that ended up in her egg. The germinal disk is damaged.
 
 
Egg 5, the yolk here didn't hold together. While tapping open the shell, I hit a large air pocket. This egg actually doesn't look fertile. Although even if the egg was, it looks like it was too damaged to do much.
 
 
Egg 6 has some funny bubbles in the air cell, it also look infertile.
 
So we went into week 2 with 2 eggs remaining in the Brinsea, and 5 in the Rotohatch.
I don't at all blame the Brinsea, I do think I should have left these eggs a bit longer before letting them turn, although egg 1 and 7 both look great. I also wonder whether incubating these eggs upright would have helped. Both eggs have lost about 1 gram of weight more than they should so I've been adding a bit more water. Egg 7 has a large saddle shaped air cell, I really hope It'll be okay.


Sunday 19 November 2017

counting your chickens, candling day 7

I gotta tell you
that first week of incubation, waiting for day 7 to candle
to see if there are signs of life
or if you are just slowly warming a tub'o'duds
is
excruciating!

The little Brinsea incubator has been fantastic, other than the room temperature alarm going off a few hours after setting, all I've really had to do is make sure to keep the water channel filled. Being the ii version, this can be done through an external bit without removing the incubator lid, there is a mark to fill up to which means only half the inner pot will have water in it.
The colour of the plastic can make a bit hard to see whether a top up is needed, although that is probably just the lighting in the room. Probably also worth mentioning that distilled water is reccomended for use in incubators, so I've purchased a bottle of it.
A few eggs have had to be repositioned a few times as they've moved a bit close to their neighbor on the turning plate, but it really has been pretty hands off.

The Rotohatch has been entirely different. Our more obviously damaged eggs went in here, placed in the incubator and left for 42 hours without turning, hopefully it would help the air cells settle. I trimmed down an egg carton, cutting the bottoms off as well to allow air flow around the eggs.
The 5 eggs in this incubator will stay in the cartons, incubated upright and as we obviously can't use the auto turner, I've had to place part of the remaining egg carton under one end so the eggs are tilted at about a 45 degree angle. Manual turning should happen an absolute minimum of 3 times a day - an odd number of turns means the eggs won't rest on the same side every night - I have gone for 5,
5 times a day the egg carton is turned so the opposite end is elevated, then I mark in a chart the time this happened.
Our little Rotohatch has a hygrometer built in, it tells me that the humidity in the incubator sits at around 45% with no water added. I don't really trust it to be honest, but plenty of people incubate without adding water at all until hatch so I chose to add no water and see whether there was even any development at all, and what each eggs weight loss had been like during the week before worrying too much.

So my first week has simply been: making sure the Brinsea hasn't run out of water
and fussing over the Rotohatch, While making sure to clean and sanitize my hands before touching any eggs... while nervously counting down the days until I could check inside.
I'm naturally a pretty anxious person so that part wasn't great fun, I had to keep reminding myself that it is better to not over handle the eggs now as it can damage the embryo
Finally, Friday! I expected to get great results from the Brinsea, and find nothing from the Rotohatch...
I was wrong

 
(I candle with a $20 LED torch from a hardware store)
Egg 1, one of 4 blue orpington eggs and my first egg out of the Brinsea. Theres an embryo! moving around right down by my torch! there are veins too, but they don't show up well here. The air cell is now quite obvious and growing well, i should have marked it with a pencil, but it was too hard to hold the torch, the egg and draw. So it was weighed and placed back
So that's good, one possible nugget.

Eggs 2,3 and 4 were our other blue orpingtons. These were all candled in order
all I could see was yolk... no veins, no embryo
I realised the air cell wasn't really growing larger
these were also weighed and placed back. Hmmm
Eggs 5 and 6 (black orpingtons) were the same. Warm and empty of obvious life. Weighed and returned. Well that doesn't look good.. it could be that they are slower to develop or that maybe it was just harder to see through their shell for some reason. I will candle again on day 10 and hope to see a  difference. They aren't smelly or oozing but i'll keep a watch on them.

Egg 7 on the other hand
 
Veins! and a tiny little eye! I did find it interesting that the 2 eggs closest together in in the Brinsea were the only 2 that look any good so far, but it could just be a coincidence.
 
The biggest surprise was when we moved on to the Rotohatch


Every single egg in there was developing! even number 12 (somehow we didn't get a photo of that one) with its worryingly shaped air cell.
I don't know if it was the extra days in the incubator withought turning, or the fact that the Rotohatch eggs are upright instead of laying down that has meant the difference in results. We aren't even using the Rotohatch as intended, I guess the eggs were probably more damaged during shipping than I thought, but we will wait until Monday night before worrying too much about writing off those 5 possible duds.
 
I've added a small tub of water to the Rotohatch as the weigh in results showed I had lost a bit more water than I had hoped, but things are looking pretty good so far!


Saturday 11 November 2017

Pre nuggets and the Brinsea Mini ii Advance

The ducklings have left, their brooder box is empty, clean, disinfected and getting a few new windows put in. If the older birds think they were being punished having to share a coop with a new bantam hen or the yard with some noisy ducks they have no idea what's about to hit them
My fertile Orpington eggs have arrived! 4 Blue and 8 Black


Shipped eggs already have a lower hatch rate than eggs you would collect from your own yard. All sorts of things can affect their viability,  including extreme temperatures and rough handling during transport and changes in air pressure if they need to be flown in
I wanted eggs from a particular breeder so I chose to take the risk, they arrived early on Wednesday the 8th of November. It is advisable to let shipped eggs rest at room temperature for 24 hours  with the large end upward when they arrive, to let the air cell settle. So ours were left in the same room we would incubate along with a bottle of distilled water I would use to increase humidity from their arrival.
On Thursday evening I cleaned and disinfected my incubators and set them runing. I have not used an incubator before, let alone these ones. I wanted to check whether they would hold a steady temperature, and whether there were any issues. All good there

I was unsure whether to set the eggs on Friday evening or Saturday morning, I wanted to be home to watch the hatch, but would they start to pip on day 21, or would the likely be hatching day 21? it can take 24 hours from pip to hatch...
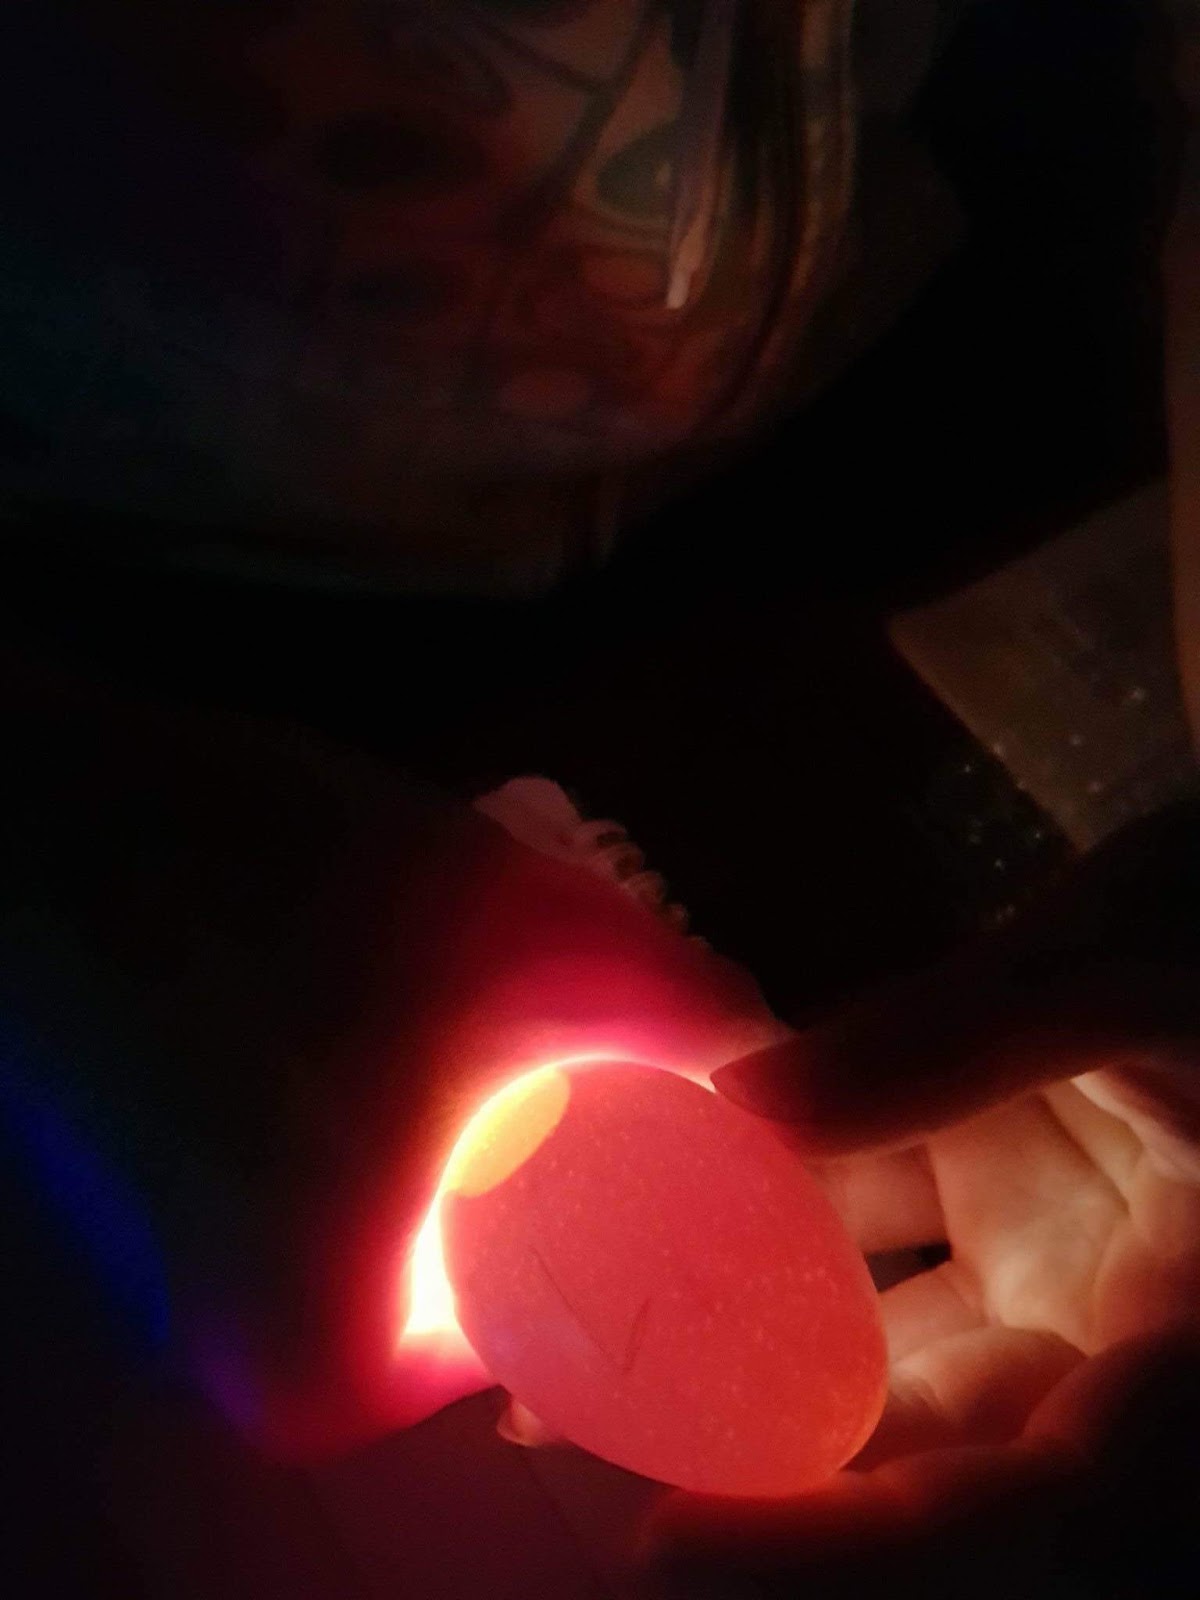
But I'm impatient, so on the evening of Friday the 10th I gathered supplies - jewelery scales, a notebook, my candelling torch a pencil and pen.
I have more faith in the Brinsea, so the eggs I have the most hope for went in there. I started with the 4 blue eggs. All weighed and documented. A chicken egg should loose about 13% of it's weight during incubation as the air cell grows and the chick develops, this is controlled by upping your humidity (if your egg looses weight too fast) or lowering it (if your egg is not loosing enough weight)
A chick incubated where the humidity is too high can drown in excess fluid when it tries to pip internally, a chick incubated where the humidity was too low can become shrinkwrapped in the membrane when it tries to hatch.

I also candelled the eggs with an LED torch to check the state of their air cell and for cracks in the shells. My first 6 looked great! maybe slightly more porous than I had expected but otherwise good. I was also used to pictures of eggs candelled partway through incubation, for some reason I expected their air cells to be bigger already but I could barely see them.
And then I got to egg 7, the egg itself had no external damage, but the air cell moved around when I turned the egg. Uh-oh! detached air cell!
I filled the Brinsea with the best eggs, filled the water cup to it's indicated line and let it start on it's way.

I was left with 5 eggs, I had expected to just lay them in the Rotohatch incubator and let it auto turn them.... 2 of those eggs had detached air cells, and 1 had a weird bubble as well. A quick look on backyardchickens.com showed that all may not be lost with these eggs.
I took an empty egg carton and trimmed it to fit the incubator, trimmed the bottom so the eggs could get air flow and set them inside.
Apparently if the air cells on these were to reattach, it would have happened during the 24 hours they sat. But I can try incubating with the eggs standing vertically, turning after 36-42 hours very gently and by putting something under one end of the carton. I will stop turning these on day 16 instead of day 18. Hmm we'll see how we go here! it seems a waste not to at least try

 
My Brinsea Mini ii advance.
It's a neat little incubator! has a huge viewing window for watching hatches, holds 7 large hen eggs and plates are available for bantam or quail eggs. There is also a cardboard insert to replace the removeable turning disk with so the chicks have something to stand on during hatching.
I understand that with the older model you had to remove the lid every time you topped up the water container, but with the mini ii, there is an opening on the outside, which is great!

It's a great incubator for a newbie like me, very set and forget. You simply press the + and - buttons together to get to the menu, here you can control temperature, turning angle, how far above and below set temperature the incubator can get before it sets off a warning and whether or not it turns your eggs automatically. You can also set the number of days for your hatch. All factory settings have been set for chicken eggs except for some reason, you will want to change the number of days from 40 to 21 (or most things, obviously, if you are setting other bird eggs)
 
There are a few other things you can play with on this model, including being able to set a period of time to cool the incubator for about half an hour, this is to replicate a mother hen leaving her nest. I haven't used this option this time.
You will find that your mini advance will make a bit of noise getting up to temperature, and that it beeps before turning eggs. Remember to read the instructions! the incubator wants to be in a room away from draughts but with good airflow, also you don't really want the room to get below 20 degrees C overnight or in a room that gets too warm during the day.

My power plug for this has a big boxy part on the plug end which means I couldn't plug anything else into the wall plug next to it (not a huge issue) also I left a window open the first night and set off the 'your room is too cold for optimal use of this incubator!' alarm. pressing okay stopped the alarm but -RM remained on the screen until I warmed the room and pressed okay again.

 
The Rotohatch
this incubator I got from a workmate, it includes a built in hygrometer and has an autoturner, has plates you swap out before hatching and has a digital display and easy to set temperature.
I don't really trust the temperature or hygrometer readings  on this machine, I had looked at buying a good thermometer and hygrometer to rely on instead but we managed to 'get talked into' (haha) buying the Brinsea incubator instead. I had intended to only set  eggs in that, but as we recieved 12...
my workmate has hatched in this incubator so we will see how we go.
it's not really designed to hold eggs vertically so if things go wrong, I won't really be able to blame it.

It doesn't really have a great viewing area during hatch, and the fan is noisy. Temperature also climbed about .2 degrees higher than I wanted the first day but seems to have settled. I won't be able to comment on turning ability as I will have to do this by hand. I do have to avoid placing eggs too close to the turning bar that hangs down as it rotates.
 
I'm excited and nervous to candle on day 7 and see if we have any development!
 
 
Not used in this experiment - the broodiest of hens, Tanky
Tanqueray goes broody about once a month. She was broody the day the ducklings arrived, and she is broody as they leave. She's more determined than any other hen, after about 6 days in the broody cage she still races straight for the nest boxes if given the opportunity.
I have no doubt, she'd be a great mama. But she wouldn't be able to sit on all of the eggs, which would mean we would end up with 2 groups of babies to protect and integrate. Plus part of the point of this exercise is to have birds that imprint on us and are friendly, which won't really happen with Tanky as mum.  


The ducklings are too cool for us, so they've made a group decision to move out!

Ducklings aren't small for very long.
Their first day with us they were tiny, curious, fluffy
bouncing around in the box they arrived in.
This was only about 5 weeks ago!


Before long they were racing around as fast as their little legs could carry them, we set up an outdoor run so they could spend their days outdoors. They loved swimming and destroying grass. Finding worms, peeping, eating, pooping, eating poop.


They weren't so fond of the part where we bundled them into a box every morning to ship them out, and back into the box in the evening to come back indoors


But they did love their indoor box. After work I would get home, clean out the wet dirty wood shavings, clean poop off the warmer (we had it turned off after about 2 weeks, but left it in as they loved climbing on it), get them fresh mint to nibble and a fresh dirt wad to destroy


They dabbled, peeped, spyed on us throuh their windows and climbed all over their cardboard box jungle gym


Even when they were so big they pushed each other off to get on top.
Towards the end of October they were starting to get a bit big for their indoor brooder box. Poop from that many big ducks naturally starts to make a now quite dusty room also a bit stinky.
All the kids had most of their juvenille feathers, their flight feathers well on the way. One of the gang let us know she was a girl by quacking loudly amongst all the baby duck noise from the others. They all let us know they didn't appreciate being picked up to go into their transport box by runing and hiding then scratching as much hand skin as they could when you could finally get hold of them.


The nights were warm enough, and they had a shelter to sleep under
it was time to let the ducks sleep outside
They pressed against the fence peeping and beeping! we want to go inside! On their second night they escaped. We went to open the coop door to let the big kids out in the morning and there they were! helping themselves to the big ducks' ponds...
Stevie, Bonnie and Whitney weren't just unimpressed. They were terrified! we aren't sure whether the ducklings just wanted to hang out with the big kids, or wanted what they saw them using, but the buffs ran and kept out of their way.
 
 
That night they cried to be let back into the house, we herded them back to their run, it wouldn't be long now and we would remove their fence for good. For the rest of the week they Stayed in their run, I would come home from work, clean their water and refill their food. Yesterday afternoon we let them out for a wander
They promptly sampled every water bowl, dug in the bushes and dove for the big ducks' ponds.
 
Sunny and Lacey sampled their food while the others stayed out of their way.
 
 
We left for the supermarket and came back after the sun had gone down
 
Our lot were in their coop, settling for bed.
The wild ducks were nowhere to be seen (or heard)
A wild duck hen yelled loudly from the bottom paddock
 
We thought maybe they'd be back this morning for breakfast, but there was still no sign of them. So I took my coffee and walked down the driveway towards the flooded bottom paddock. It's a popular hangout spot for the local mallards and there are many families down there... including 9 new juvenile ducks.
So the dorks have moved on, but it's a good thing. We never expected them to stay, and now they can learn how to do wild duck things like forage and fly from other wild ducks
Good luck peepers!